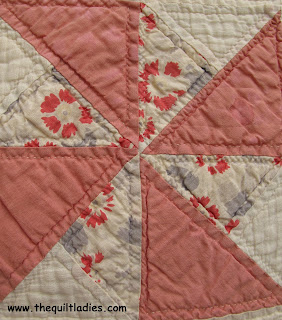
Showing posts with label simple quilt block pattern. Show all posts

Thursday, July 12, 2012

Quilt Ladies Walking Pin Wheel Quilt Pattern

Pin It
Walking Pinwheel 
has gone NUTS.  

I'm asked for it 2-3 times a week. So, to make things a bit
easier on me, here to go ! 
BUT keep comments coming, 
you NEVER know what you will receive back ! 

Free Walking Pin Wheel Quilt Pattern Block
Walking Pin Wheel Quilt Pattern Block


Finished Block size 12” x 12” Cutting for ONE Block

Cut 4 Yellow – 4 1/2” x 2 1/2”
Cut 8 White – 2 1/2” x 2 1/2”
Make Flying Geese


Cut 4 Burgundy – 2 1/2” x 2 1/2

Cut 2 White – 2 7/8” x 2 7/8” 
Cut 6 Green – 2 7/8” x 2 7/8”
Cut 6 White – 2 7/8” x 2 7/8”
Cut 2 Burgundy – 2 7/8” x 2 7/8”
Make Triangles

Cut 8 White – 2 1/2” x 2 1/2”


Quilt Pattern Block Tuturial

Do 4 of this Unit 

The Quilt Ladies Store

how to make a walking pin wheel quilt pattern block

Turn block and sew into rows and rows into the block

Finished Block


The Quilt Ladies Store Logo


Wednesday, June 6, 2012

My Great, Great Grandmother's Pin Wheel Quilt Block Pattern

Pin It
My Great-great Grandmother's Quilt
was made with this pattern
Finished block will be 6" x 6"
Free Pin Wheel Quilt Block Pattern
My Great, Great Grandmother's Pin Wheel Quilt Block Pattern

Cutting for ONE Block

Cut 2 Green - 3 7/8" x 3 7/8"
cut each block from corner to corner
(shown as gray)

Cut 1 Pink 4 1/4" x 4 1/4"
cut corner to corner and then again, corner to corner
(shown as red )

Cut 1 White 4 1/4" x 4 1/4"
cut corner to corner and then again, corner to corner
(shown as white)


My Great, Great Grandmother's Pin Wheel Quilt Block Pattern

Piece 4 blocks together as shown 


Sew into rows

Sew rows together
My Great, Great Grandmother's Pin Wheel Quilt Block Pattern

Please remember, 
there are other methods of piecing 
the quarter triangle, this is how I do it.


beth of beth ann doing

Read my book “The Quilt Ladies” 12 Quilt Stories and 15 Complete Quilt Patterns Make Retirement fun with my “How to Survive Retirement” a Check List 

The Quilt Ladies Quilt Pattern Etsy Shop HERE for YOUThe Quilt Ladies and Beth Ann This post may contain affiliate links. I will receive a few cents if you click to their site and purchase. #quilt #quilting #thequiltladies #patchwork #bethanndoing #quilts #needlework

https://www.etsy.com/shop/QuiltLadies

Monday, January 2, 2012

Free Quilt Table Topper

Pin It
I was asked by my quilt group to re-post this.

Free Table Topper Pattern for you !


quilt pattern free, how to make a table topper

I'm using a charm package, but any fabric will work.

Cut 25 - 2 1/2" x 2 1/2"

Cut 20 - 1 1/2" x 2 1/2"

free quilt tutorial for table runner

Sew into rows with 5 squares across

Cut 16 - 1 1/2" x 1 1/2"


Sew together to form the cross border
how to make a table topper tutorial

Sew all the rows together, forming the center.

Cut 2 - 14 1/2" x 4 1/2'
Sew to the top and bottom

Cut 2 - 22 1/2" x 4 1/2"
Sew to the sides
table runner tutorial 

Layer quilt together, machine quilt or hand quilt. 
Cut Binding 77 " x 2 1/2" to finish quilt off
how to quilt books
The Quilt Ladies Store


The Quilt Ladies Store
I am the Author of The Quilt Ladies Book Collection
and Little Quilt Ladies Quilt Patterns


I make/design all quilt block patterns on this site


Wednesday, November 23, 2011

Quilt Charm Table Topper Complete Pattern for You

Pin It

Quilt Ladies NOW on KINDLE - HERE


A Holiday Pattern for you !


Quilt Charm Table Topper Complete Pattern for You

I'm using a charm package, but any fabric will work.

Cut 25 - 2 1/2" x 2 1/2"

Cut 20 - 1 1/2" x 2 1/2"

Table Topper Complete Pattern for You

Sew into rows with 5 squares across

Cut 16 - 1 1/2" x 1 1/2"

Quilt Charm Table Topper Complete Pattern for You

Sew together to form the cross border
Table Topper Complete Pattern for You

Sew all the rows together, forming the center.

Cut 2 - 14 1/2" x 4 1/2'
Sew to the top and bottom

Cut 2 - 22 1/2" x 4 1/2"
Sew to the sides
Quilt Charm Table Topper Complete Pattern for You 

Layer quilt together, machine quilt or hand quilt. Cut Binding 77 " x 2 1/2"
to finish quilt off.


See all The Quilt Ladies Books and Quilt Patterns - HERE 
Beth is the Author is The Quilt Ladies Books Available at The Quilt Ladies Store – HERE

Wednesday, June 1, 2011

How to make a Square Quilt with ONLY Squares

Pin It

Received a phone call from a very dear friend who’s taken the plunge and is learning how to quilt.  HERE – is how she started. The next question is, “How do I do a quilt top? ”

I know when you see a finished quilt it can seem very overwhelming. I’m going to walk you thought making a quilt top over the next few weeks.

Remember, “It’s Only a Square”    Finished Quilt Size:  46”x 46”  1 yard of each color will be more than needed to do this project.

Cut  160 – 2 1/2” x 2 1/2” in assortment of colors (I used a dark, medium and light) approx. 1 yard of each color !

It's ONLY a Square, How to make a Square Quilt with ONLY Squares

Lay out each block before sewing it together, there is no right way or no wrong way. I’ve included some examples of color placement, these are examples, have fun move colors around and you will need 16 blocks.  Use a ¼” seam allowance and press your seams to one side. 

How to make a Square Quilt with ONLY SquaresHow to make a Square Quilt with ONLY Squares
Lay out 3 in each row
And do 3 rows.

You will need a total of 16 pieced block, so have fun, move color around, here is just a few examples:


Take a few weeks and I'll walk you through putting the block together with sashing and borders, let's say 2 weeks ! Keep checking back !


So, get the fabric out, get cutting, piecing and let's make a quilt top  !


Be Kind to all,  
Beth


Thank you for supporting my Etsy shop and my Quilt Ladies Book on Kindle and Nook, nothing is possible without your purchases, Beth
The Quilt Ladies ONLY on Kindle and NOOK


Friday, November 12, 2010

Rosebud Quilt Pattern

Pin It
The name of this block is "The Rosebud" 
I had fun with color on my block, but looking now, I would have made the corner green darker, but hindsight... 
bethanndoing.com
Rosebud quilt pattern
Finished Quilt Block size 10" x 10"

Cut 1 White Center         6 ½’ x 6 ½”

Cut 4 White        4 ½” x 1 ½”
Cut 4 White        6 ½’ x 1 ½”


Cut 8 Green         1 ½” x 1 ½”

Cut 4 Green        3 ½” x 1 ½”
Cut 4 Red             1 ½” x 1 ½”
Rosebud quilt pattern

Sew Happy, Beth

The Quilt Ladies NOW on Kindle and NOOK
The Quilt Ladies Book by Beth Ann Strub


Saturday, February 13, 2010

Valentine Hearts Quilt Table Runner

Pin It
On a Whim...
I moved into my sewing room and took out "The Box" all the odds-n-ends, they are just to good to throw away. So I'm making a different kind of Valentine.

Hearts Quilt Table Runner

After finishing the table topper, I wanted to use red but a bit different.

Valentine Hearts Quilt Table Runner


I chose a green with red flowers and a red paisley.

Red is cut 1 1/2" x 1 1/2"

Green is cut 1 1/2" x 1 1/2"

Green is 2 1/2" x 1 1/2"
Heart Quilt Table Runner


Sew the Red to the Green square 1 1/2 x 1 1/2", then add the 2 1/2 x 1 1/2"


Heart Quilt Table Runner

Cut Squares 2 1/2" x 2 1/2"


Valentine Hearts Quilt Table Runner

Sew to the ends and trim to 1/4" all around
Valentine Hearts Quilt Table RunnerValentine Hearts Quilt Table Runner free pattern
Ready for batting, backing and some quilting.

Have a wonderful VALENTINE'S DAY ! !
Sew Happy,
Beth
on a whim, don't you love that,
On A Whim (Ha)
The Quilt Ladies Store

Related Posts Plugin for WordPress, Blogger...